Rotation
The following discussion is made under the assumption that the Z-axis points upwards in the 3D modeling software. In case is the Y-axis the one pointing upwards, swap the letter Z with the letter Y (and vice versa) in the subsequent sections.
Floor items
For floor items it is worth making a distinction between axis of rotation.
Around Z-axis: An angle of rotation around this axis can be assigned within the app while editing the project in 2D and it's trivially the only rotation visible in the 2D. Regarding the initial orientation around the Z-axis two different cases exist:
-
the item does not exist inside magicplan yet: the initial rotation around the Z-axis is then arbitrary.
-
the item exists already as a magiplan symbol: it is important to make sure that the initial rotation of the 3D item corresponds to that of the 2D symbol. Consider the following picture, representing a bed item in magicplan:
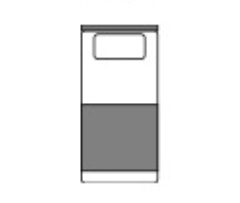
Taking into account the coordinate system used inside magicplan (top right in the next picture), it is easy to see that the headboard of the bed points towards the negative Y-axis (or, on the contrary, the foot points towards the positive Y-axis): the 3D model of the bed, must have the same orientation.
Around X/Y-axis: The model should be built in such a way as to guarantee that the surface of the item that touches the ground (where the pivot is placed) lies on the XY projecte.
Wall items
To define wall-mounted item rotation, it is important to first define the normal of such an item:
The normal of a wall-mounted item corresponds to the normal of the back plane of the item pointing away from the wall where the item is placed.
The back plane of the item is the one used to define the position of the pivot.
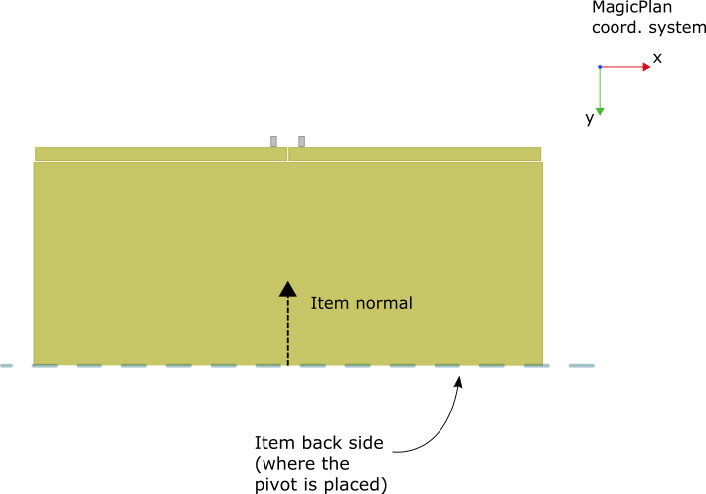
The default orientation of an item should be such that its normal points toward the negative Y-axis (with respect to magicplan coordinate system).